
Webflow used to leave structured data entirely to you. If you wanted search engines and AI tools to know that a page was an article, a service or a product, and which business stood behind it, you pasted JSON-LD into a custom code box and hoped nothing broke.
That changed. Webflow now has a dedicated Schema markup field in every page's settings, and Webflow AI can fill it in for you with one click. Most Webflow schema guides online were written before that field existed, so they still tell you to paste everything into custom code.
This guide covers how schema works in Webflow today: the places it can live, which kind of markup belongs in which place, what Webflow AI does well and what to check after it runs, the Collection fields the schema field can't use (this is where most Webflow sites end up with gaps), and how to confirm it all works on the live site.
If you are new to structured data, the short version: it is a block of code in the page that states facts in a fixed vocabulary from schema.org, such as "this page is a blog post, written by this person, published by this company on this date". Search engines use it for rich results. AI search tools use it to understand what a page is and who is behind it, which matters more each year as more people ask ChatGPT, Gemini or Google's AI Mode instead of clicking through results.
The places schema can live in Webflow
There are four places you can put structured data in a Webflow site. They all end up in the page's code, but they behave differently.
- The Schema markup field (Page settings). Added per page, including Collection template pages. Webflow's help article says it needs a paid Site plan or a paid Workspace, and that whatever you put there appears in the page's head. On a Collection page you can connect it to Collection fields so each item gets its own values. This is where Webflow AI's "Generate schema markup" button lives.
- Page custom code (Page settings > Custom code). The older way: paste a full
<script type="application/ld+json">block into "Inside head tag" or "Before body tag" for one page. - Site-wide custom code (Site settings > Custom code). Code here goes onto every page of the site.
- A Code Embed element placed on the page in the Designer. Useful when the markup needs to sit next to the content it describes.
Webflow's own advice on the overlap is clear: markup you already added through custom code keeps working, there is no need to move it, and you shouldn't put schema in both the Schema markup field and custom code for the same page, because that creates duplicate structured data.
Which markup belongs where
The places above suit different jobs. The mistake we see most is putting everything in one place, usually either "all of it site-wide" or "a separate copy of everything on every page".
Your business details: once, with a fixed ID
Every site has one thing it should describe exactly the same way everywhere: the business (or person) behind it. Name, logo, address if you have one, phone or email, and the links to your profiles elsewhere, such as LinkedIn or your Google Business Profile. In schema.org terms that is an Organization or one of its more specific types such as LocalBusiness.
The clean way to do this is to describe the business fully once, give that description a permanent ID, and have every other page point at that ID instead of describing the business again. An ID here is just a web address with a label on the end, for example:
{
  "@context": "https://schema.org",
  "@type": "Organization",
  "@id": "https://www.example.com/#organization",
  "name": "Example Studio",
  "url": "https://www.example.com/",
  "logo": "https://www.example.com/images/logo.png",
  "sameAs": [
    "https://www.linkedin.com/company/example-studio"
  ]
}
Put this on the homepage, in the homepage's Schema markup field or its custom code (one or the other). Then a blog post's markup can say its publisher is {"@id": "https://www.example.com/#organization"} and a machine reading it knows exactly which business that is, without the post repeating the address and logo.
Why bother with the ID? Because when ten pages each describe the business in their own words, small differences creep in: one says "Example Studio Ltd", another has an old phone number, a third leaves out the logo. To a person those are the same company. To software trying to build a picture of your business, they are conflicting claims. One full description plus references to it removes the conflict. We explain the idea in more depth in our post on connected entities, and you can check whether Google already recognises your business with the free knowledge graph check.
Site-wide custom code is the tempting shortcut for the business block, and it isn't wrong as long as the block is identical on every page and carries the same ID. What doesn't make sense is putting page-specific markup site-wide. An Article block in site-wide code would claim that every page on the site is the same article.
Each page's own markup: in its Schema markup field
What a page is belongs to that page alone: this one is a service, that one is an article, the pricing page is a product with offers, the contact page is a contact page. That markup goes in the page's own Schema markup field, and it should point at the business by ID rather than describing it again.
Repeating content: on the Collection template
Blog posts, case studies, team members, locations, products in a CMS Collection. You write the markup once on the Collection template page and connect it to fields, so every item gets its own title, date, image and so on. More on the limits of this below, because it is where most Webflow sites run into trouble.
Using Webflow AI to generate schema
The "Generate schema markup" button reads the page and writes markup for it. Webflow's help article lists what you need: Webflow AI switched on in Workspace settings, a paid plan, a role above Reviewer, an empty Schema markup field, and enough content on the page for the AI to work with. On a Collection page, it says relevant fields from the Collection (it gives name, address, price and image as examples) are included automatically. During the beta, generation only works in the site's primary language; other languages need markup added by hand.
It is a good starting point, especially for pages where you would otherwise have nothing. Webflow itself recommends checking the result in a testing tool, and it is worth going further than "does it validate". Things to look at:
- Does it describe your business the same way on every page? The button works page by page. Compare what it wrote on two or three pages. If each one has its own full description of the business, with small differences, replace those with a reference to the one business block on your homepage.
- Does it use IDs at all? Without them, the pieces on a page sit side by side without saying how they relate. An article should point at its author and publisher, and a service should point at the business that provides it.
- Did it pick the right type? A page about one service should say
Service, not justWebPage. A local business should use the most specific type that fits, for exampleDentistrather than plainLocalBusiness. - Is every fact true? The AI can only use what is on the page. If the page doesn't show opening hours, it shouldn't invent them. If your FAQ answers are hidden in collapsed sections, check that the answers in the markup match the real answers word for word.
Treat the generated markup as a draft you edit, not a finished job.
Collection pages: the fields the schema field can't use
This is the part that catches most Webflow sites, so it is worth reading slowly.
When you add markup to a Collection template's Schema markup field, you connect parts of it to Collection fields, so each item's page fills in its own values. Webflow's help article lists the field types that work: Plain text, Image, Video link, Link, Email, Phone, Number, Date/Time, Switch, Color, Option and File.
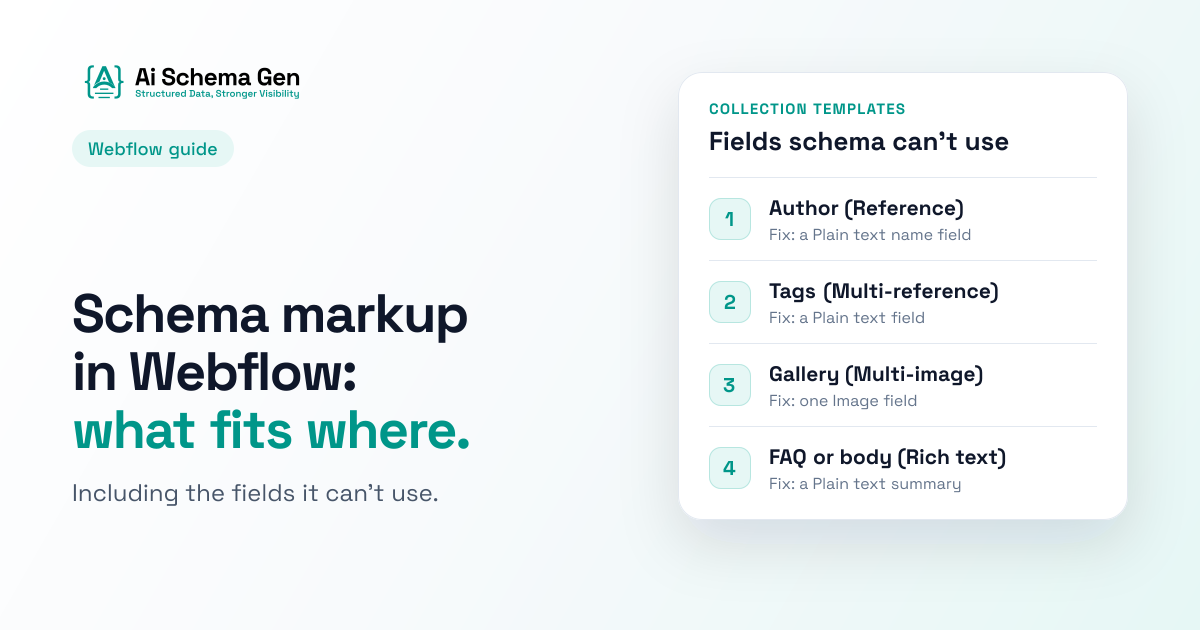
And it states plainly which ones don't: Reference, Multi-reference and Multi-image fields aren't supported in schema markup. Rich text isn't on the supported list either.
That sounds like small print until you look at how most Webflow blogs and directories are built:
- Authors are usually a Reference field. A typical blog has an Authors Collection, and each post picks its author from it. That means the schema field can't pull in the author's name, so the post's markup either has no author or the same author on every post.
- Categories and tags are usually Reference or Multi-reference fields. Same problem for anything that groups items.
- Image galleries are Multi-image fields. Product or property pages with several photos can only feed one image (from an ordinary Image field) into the markup.
- FAQ answers and long descriptions are usually Rich text. They can't be connected directly.
None of this is a dead end. The fix in each case is to give the Collection a plain field the schema field can use:
- Author: add a Plain text field for the author's name and a Link field for the author's page on your site to the posts Collection. Yes, it duplicates what the Reference already knows, but it is the field the markup can read. Fill it when you assign the author.
- Main image: keep at least one ordinary Image field (often the main or featured image) on every item, and connect that one.
- FAQ: if a Collection item has a handful of questions, store each question and answer in its own Plain text fields so the markup can use them. If the answers need formatting, keep FAQ markup on static pages instead, where you can write it by hand.
- Short description: add a Plain text summary field rather than pointing the markup at the rich text body.
Two more things the help article warns about. If you delete a Collection field that the markup uses, the connection breaks and you have to point it at another field. And empty fields are worth checking: if an item leaves a connected field blank, look at that item's published page to see what the markup ends up saying. A property with an empty value is usually worse than no property.
It is also worth testing one item whose title contains quotation marks or an ampersand. Structured data is strict about punctuation, and a quotation mark in the wrong place can break the whole block. Run that item's published page through a testing tool once and you will know for sure.
Staging, publishing and absolute addresses
Webflow publishes to your custom domain and to the free webflow.io staging address. Your markup goes to both. That is fine, with two habits:
- Write every address in the markup as a full address on your real domain. IDs,
url,logoand author page links should start withhttps://www.yourdomain.com/, never a path on its own and never the webflow.io address. Otherwise the staging copy and the live site describe "different" businesses, and anything a crawler picks up from staging points at the wrong place. - Keep the staging address out of search. In Site settings > SEO > Indexing, turning Staging indexing off makes Webflow publish a robots.txt on the webflow.io address telling search engines to ignore it (Webflow's guide says this needs a paid plan).
While you are on that settings screen, look at the traffic control switches too. Webflow can generate robots.txt rules for groups of known bots, with one switch for search engine crawlers and one for AI bots. Both are on by default. If someone switched the AI bots group off, crawlers such as GPTBot, ClaudeBot and PerplexityBot are asked not to crawl the site, and your structured data never reaches them, however good it is. Note that Webflow puts OAI-SearchBot, the crawler behind ChatGPT search, in the search engine group, so the AI bots switch alone doesn't decide whether ChatGPT search can see you. Our post on AI crawler access explains which bots matter and why.
How to check it worked
Webflow's own note on testing is short: check your markup with a structured data testing tool. Here is the full routine.
- Publish first. Whether custom code runs in Webflow's preview depends on a setting, and the published page is what crawlers actually receive, so check the live page, not the canvas.
- Look at the page source. On the live page, right-click and choose View page source, then search for
application/ld+json. You should see your block in the head. If you see two blocks describing the same thing, you have it in both the Schema markup field and custom code. - Validate it. Paste the page address into the Schema Markup Validator (validator.schema.org), which Webflow's help article names, to check the code against the schema.org vocabulary. Use Google's Rich Results Test to see which rich results the page is eligible for. They answer different questions, and a page can pass one and fail the other.
- Check a few Collection items, not just one. Pick an item with every field filled, one with gaps, and one with awkward punctuation in its title.
- Check the connections. Does the article point at the publisher's ID, and does that ID match the one on the homepage exactly, letter for letter? Our free Chrome extension draws the entities on a page and how they connect, and flags references that point at nothing.
Then check the whole site. A single page can look fine while the site as a whole has no business description, inconsistent details or AI crawlers blocked. Our free AI readiness checker looks at the site as a whole.
Where AI Schema Gen fits on a Webflow site
Webflow sites connect to AI Schema Gen as a copy-and-paste site. You fill in your business details once in Business Identity, and Sites > Get the code gives you the homepage business block, with a fixed ID, ready to paste into the homepage's custom code (Webflow's steps are shown next to the code). When your details change, the Sites page tells you there is new code to copy.
Two honest limits. Today the copy-and-paste route covers the homepage business block only, not markup for each page, so page-level markup is still the Schema markup field's job. And because Webflow has its own Schema markup field, use one place for the business block on the homepage, not both. Everything else in this guide (checking the connections, the Collection field workarounds, the crawler switches) applies however you write the markup.
Common Mistakes
- Putting schema in both the Schema markup field and custom code. Webflow warns against it; you get duplicates that can disagree.
- Page-specific markup in site-wide code. An article or product block in Site settings custom code claims every page is that article or product.
- Describing the business separately on every page. Describe it once with an ID and point at it everywhere else.
- Connecting the author through a Reference field. It isn't supported. Add a Plain text author field instead.
- Pointing markup at Rich text. Use a Plain text summary field.
- Relative or staging addresses in the markup. Every ID and link should be a full address on the real domain.
- Trusting Webflow AI's output without reading it. Check the type, the IDs, and that every fact appears on the page.
- Checking in the Designer preview. It may not run custom code, and it isn't what crawlers see. Check the published page.
- Leaving the AI bots switch off. Markup can't help if the crawlers are asked to stay away.
FAQ
Does Webflow support schema markup?
Yes. Every page, including Collection template pages, has a Schema markup field in Page settings, and you can still add structured data through custom code or a Code Embed element. The Schema markup field needs a paid Site plan or a paid Workspace.
Can Webflow AI generate schema markup?
Yes. Page settings has a "Generate schema markup" button that writes markup based on the page's content. It needs Webflow AI switched on for the Workspace, a paid plan, an empty Schema markup field and enough content on the page. During the beta it only works in the site's primary language. Check what it writes before publishing.
How do I add dynamic schema to Webflow CMS pages?
Open the Collection template page's settings, add your markup in the Schema markup field and connect its values to Collection fields. Only some field types work: Plain text, Image, Video link, Link, Email, Phone, Number, Date/Time, Switch, Color, Option and File. Reference, Multi-reference and Multi-image fields aren't supported, and Rich text isn't on the list.
Why can't I use my Authors Reference field in schema?
Webflow doesn't support Reference fields in the Schema markup field. Add a Plain text field for the author's name (and a Link field for the author's page) to the posts Collection and connect those instead.
Should my Organization schema go on every page in Webflow?
Describe the business fully once, usually on the homepage, with an @id, and have other pages point at that ID. If you prefer to put the business block in site-wide custom code, make sure it is exactly the same on every page, including the ID.
Do I need to move schema from custom code into the new field?
No. Webflow says markup added through custom code keeps working. Just don't keep the same markup in both places.
Why doesn't my schema show up in the Webflow preview?
Webflow only runs custom code in Preview when its "Enable custom code" option is on, and the Designer shows script blocks as placeholders. Either way, publish (staging is fine) and check the live page's source, since that is what crawlers read.
Does schema markup guarantee rich results or AI citations?
No. Valid markup makes a page eligible for rich results and easier for AI tools to understand, but search engines and AI tools decide for themselves what to show.
Check your Webflow site
Run your Webflow site through the free AI readiness checker to see whether your business is described consistently, whether your pages say what they are, and whether AI crawlers can reach them at all.
Is your website ready for AI?
Check now. Free readiness score in under a minute, no signup, no card.